
Turning a YouTube Tutorial into a Written Step-by-Step Guide
September 9, 2026 · 7 min read
Video is a good way to learn a task once and a bad way to do it the second time. Every pause, every scrub back to catch the setting you missed, every "wait, which menu," costs more than the step itself. A written guide fixes that, and the transcript gets you most of the way there in about fifteen minutes.
Get the transcript with timestamps on
Paste the tutorial's link on LinkTranscript and leave the Timestamps toggle on. Each line's time is going to end up in your guide, beside the step it belongs to, so that when the words are not enough you can click straight to the screen.
Check which kind of caption track you have. Software tutorials are full of menu names, commands, and version numbers, and automatic captions are unreliable on all three. Read three lines: punctuation and capital letters mean a person wrote or corrected the track; lowercase fragments that run together mean it is automatic. With an automatic track, plan to verify every exact value against the video, which the timestamps make quick.
Find the steps
Tutorials announce their steps out loud. Search the transcript for "first," "next," "then," "now," "after that," and "the last thing." Each hit is a candidate step boundary, and the count beside the search box tells you roughly how many steps there are before you have read anything.
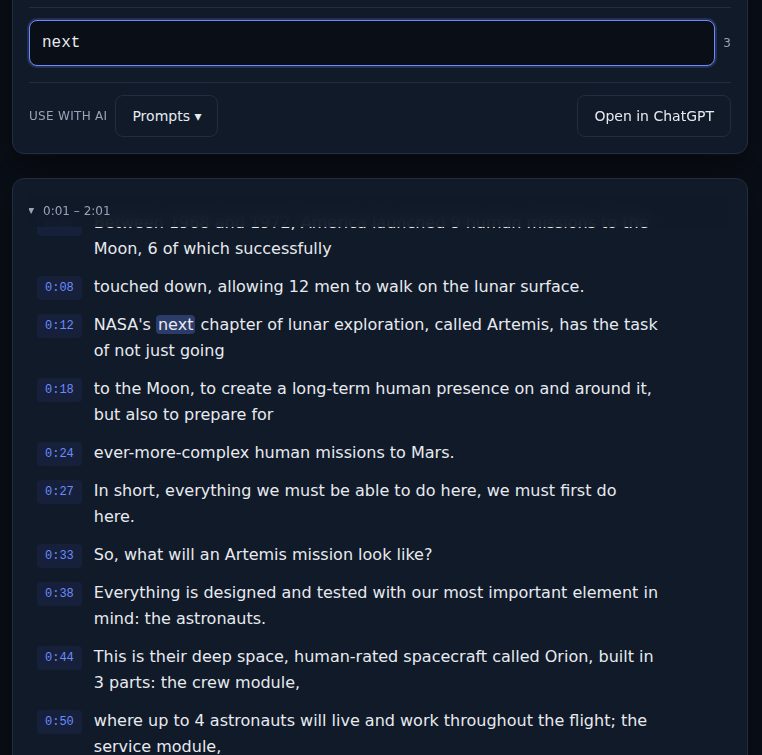
Some presenters never say "next." They narrate what they are doing instead, so search the verbs: "click," "open," "go to," "select," "add," "drag." The hits are the actions, which is what a step is anyway, and the timestamps put them in order.
Read the highlighted lines in order and write a one-line summary of each step as you go, with its timestamp. Ignore the explanation between steps for now; you are building the skeleton. A twenty-minute software tutorial usually has ten to twenty steps.
Capture every exact value
This is where the written guide earns its keep and where video is worst. Settings, file paths, commands, measurements, temperatures, part numbers, the name of the menu item: anything the presenter reads out or types, you want verbatim.
Search the transcript for the kinds of values the tutorial contains. For software: "type," "enter," "set," "change," "click," and any command names you heard. For a recipe: "cup," "gram," "degrees," "minutes." For a repair: "torque," "millimeter," "part." Copy each value into the step it belongs to.
Then verify. Click the timestamp for each value and look at the screen, because a value that was typed and never spoken is not in the captions at all, and a value that was spoken may have been mis-heard. This is the one place to spend real time. A guide with one wrong path or one wrong quantity is worse than no guide.
Write the steps
Numbered, one action per step, imperative mood, the exact value inside the step, the timestamp at the end. The shape looks like this:
## Setting up the project

1. Open a terminal in the folder where the project should live. (0:42)
2. Run the create command the presenter types, and pick the options they pick. (1:05)
3. Open the file they open and delete the section they delete. (2:30)
The same shape works for anything hands-on. A recipe becomes numbered steps with the quantity and the time inside each one ("Simmer for 12 minutes, stirring twice. (6:15)"). A repair becomes steps with the tool and the part number ("Remove the four T8 screws under the bottom cover. (3:40)"). What changes is the kind of value you are capturing; what stays the same is one action per line and the timestamp at the end.
Keep the presenter's explanations out of the steps and put them in a short paragraph under the heading when they matter ("this step only applies on Windows"). Steps should be scannable while your other hand is on the mouse.
Group steps under headings at the points where the presenter changed screens or topics. Those are usually where your search for "now" and "next" found a cluster.
Let an assistant draft the skeleton, if you like
The Prompts menu on the transcript page has a Bullet Notes entry and a Custom Prompt entry. Custom Prompt with "Extract every step the presenter performs as a numbered list, one action per item, with the exact commands and values quoted and the timestamp where each occurs" produces a usable skeleton for most tutorials. Treat it as a draft. Assistants are good at finding the steps and bad at the exact values, for the same reasons the captions are, so the verification pass above still has to happen after a draft.
Keep it attached to the source
Put the video title and link at the top of the guide, with the date you wrote it. Software changes; a guide that says which version of the tool it was written against, and links to the video, will still be useful when the menus move, because the reader can check the screen. The Markdown export from LinkTranscript already has the title, the link, and the language in its header, so if you build the guide in that file, that part is done.
When to bother
Not every tutorial deserves a guide. Write one when you expect to do the task again, when you are doing it for someone else, or when the tutorial is the only documentation that exists, which is common for older software and for anything hands-on. A tutorial you will follow exactly once is fine as a video.
Write the guide the first time you follow the tutorial, while you are pausing anyway. The second time through, you will not need the video.
Try it on a video
Paste a YouTube link and get a clean, exportable transcript in seconds.